Starting a blog is a very simple process and all you need is a domain, a web hosting account, and the ability to write posts. In an earlier post, I wrote about how to choose a perfect domain name and a web hosting service.
I recommended Bluehost because I am using it for 5 years for one of my blogs and it’s working great. If you are already a blogger or know how bad web hosting can be a nightmare for us, then you definitely can understand when I use the “great” word here. Bluehost is the perfect solution for small to large blogs and websites and their support is awesome.
In this post, I will show you how you can easily signup to Bluehost and set up WordPress within minutes.
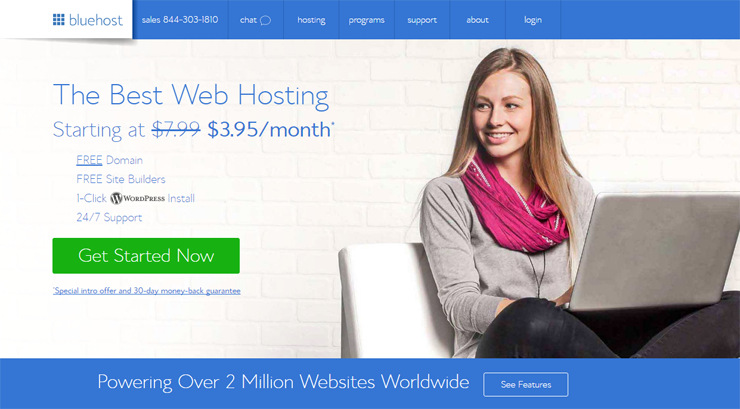
STEP 01: Go to BlueHost.com
First thing, Go to www.Bluehost.com and click on the “Get Started Now” button on the left side of the home page.
STEP 02: Select your Web Hosting Plan
After clicking the green Get Started Now button from the home page, you will be taken to the hosting plan page with 3 web hosting plans described as basic, plus, and prime.
For the starter, Bluehost’s “basic” plan is perfect since for any new website or blog we are not expecting millions of visitors per day therefore prime and plus plans are not suitable for us at the moment. If later on, your blog traffic has that many visitors each day then you should definitely move to those packages for better results and great extra features.
Click on the “Select” link under the “basic” plan bar.

STEP 03: Choose a Domain Name
On the next page, you will be asked to book a new domain name or either enter the existing one if you have already booked one.
You can choose whatever domain name you like and see if that is available or not. For choosing a better domain name you should check our detailed post about how to choose a perfect domain name.

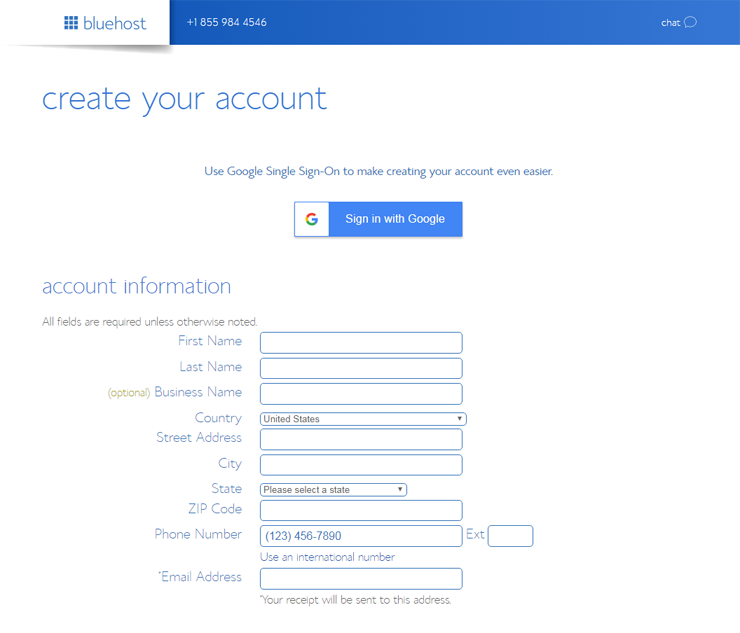
STEP 04: Fill in the Account Information
You can skip STEP 3 if you want to choose a domain name later. The next step will require you to add your account information, such as your name, business name, city, state, country, email address, etc.
Please add your personal information carefully as this will be used later for Bluehost communication with you. All the emails will be sent to the email address you will enter here.
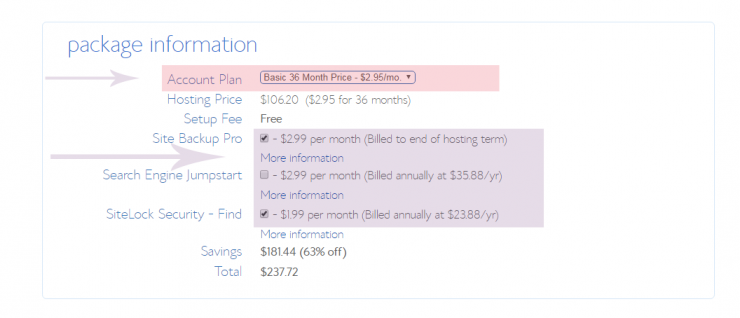
In the package information section, you will select your Account Plan and a few add-on are included.
The Account Plan is by default set to 36 monthly plan but you can choose it for any time period. I recommend keeping it for 36 months because the longer the time period you will select the fewer monthly charges you will pay.
But for ad-on (Site Backup Pro, Search Engine jumpstart, SiteLock Security), I would suggest not selecting any ad-on for now. We can obviously signup for any of them later. For now, let’s go with a minimum budget.
In the last, you will be required to add your payment information to pay. Once paid, you should receive an email confirming the purchase and signing up at Bluehost along with Cpanel Access URL and login information.
STEP 05: Installing WordPress in One Click
You should be able to complete the signup process by now. Now in this STEP 5, we will cover all the steps of installing WordPress through the Bluehost one-click installation process.
In the email, you will find the Cpanel link which will take you to the control panel of your web hosting account.
Under the main menu of the “hosting” tab, you should see a second menu called “Cpanel”, Click on it. Scroll down the page and in the “Website” section click on the “install WordPress” button.
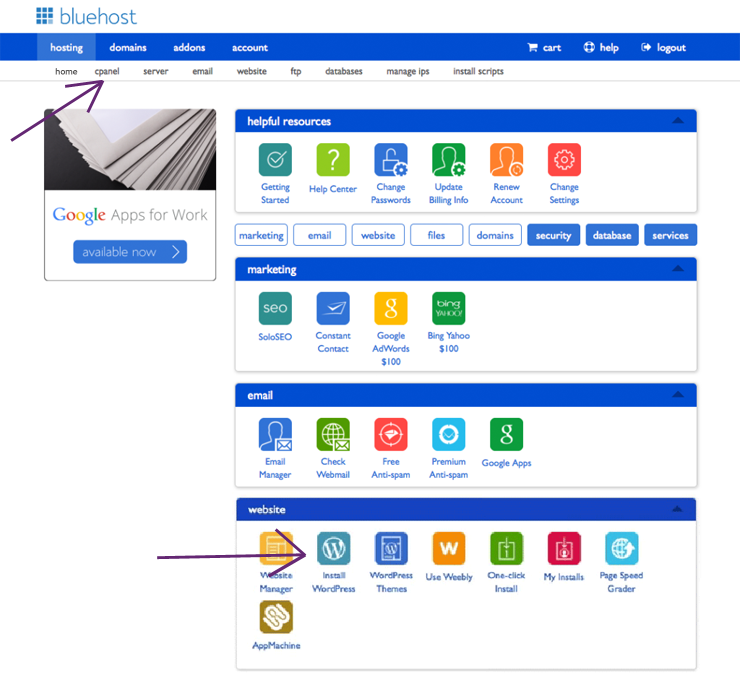
Please note, Bluehost uses “Mojo Marketplace” for quick installation of the applications. Once clicked on the Install WordPress button you will see the next page as shown below (The steps and screen previews might be updated by the time you are reading this post).

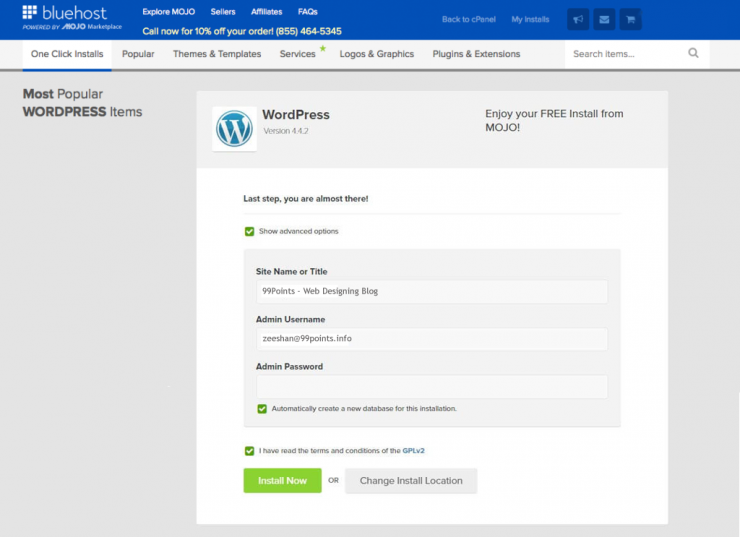
Click on the green “Install” button as shown on the above page to start the installation of WordPress. The next screen will allow you to choose your domain or directory. See the below image.

“Check Domain” button will verify if the domain is valid and available and on the next page you should see the final step of the process. Before clicking on the “Install Now” button please check “Show advanced options” if you want to change the site name or admin username.
Also, make sure to check the “I have read…” checkbox before pressing the Install Now button.
Once everything is done you can access your site on the domain you selected in the above process, i-e http://your-domain.com and the admin panel will be available on http://your-domain.com/wp-admin
In the next few posts we will be covering topics related to WordPress admin and theme selection so please don’t forget to subscribe to our mailing list and follow our Facebook page @99points
If you think this post has helped you in any way to start and improve your expertise in blogging, then you can also imagine the efforts I took to create such quality content. :)
Please share this post with your friends and comment below to let me know if there is any problem you faced at any step.